Difference between revisions of "What is RocketBar"
(translated from Russian) |
(→RocketBar configuration) |
||
| (One intermediate revision by the same user not shown) | |||
| Line 21: | Line 21: | ||
* Trash. | * Trash. | ||
| − | [[File:RocketBar. | + | [[File:RocketBar-en.png|550px]] |
== Adding RocketBar to desktop == | == Adding RocketBar to desktop == | ||
| Line 27: | Line 27: | ||
In order to add RocketBar to desktop, one should click on Plasma-Desktop icon which is located at the upper-right part of your desktop and select "RocketBar" in the "Add Panel" menu. | In order to add RocketBar to desktop, one should click on Plasma-Desktop icon which is located at the upper-right part of your desktop and select "RocketBar" in the "Add Panel" menu. | ||
| − | [[File: | + | [[File:RocketBar2-en.png]] |
When added to desktop, RocketBar automatically locates itself at the bottom of the window and adjusts its height according to the screen resolution. | When added to desktop, RocketBar automatically locates itself at the bottom of the window and adjusts its height according to the screen resolution. | ||
| Line 40: | Line 40: | ||
* Additional – opens a window with additional RocketBar settings. | * Additional – opens a window with additional RocketBar settings. | ||
| − | [[File: | + | [[File:RocketBar3-en.png|550px]] |
More plasmoids can be added by dragging them from the "Add plasmoids" window of the configuration panel. | More plasmoids can be added by dragging them from the "Add plasmoids" window of the configuration panel. | ||
| − | [[File: | + | [[File:RocketBar4-en.png|550px]] |
In order to add quick-launch icons to the left zone of the RocketBar, one should just drag necessary icon from SimpleWelcome. A newly added application will not be displayed at the central zone of the RocketBar; active instance of that application can be accessed by clicking the quick-launch icon again. If you drag mouse over an icon of some application, you will see a thumbnail of a running instance of that application, if any. | In order to add quick-launch icons to the left zone of the RocketBar, one should just drag necessary icon from SimpleWelcome. A newly added application will not be displayed at the central zone of the RocketBar; active instance of that application can be accessed by clicking the quick-launch icon again. If you drag mouse over an icon of some application, you will see a thumbnail of a running instance of that application, if any. | ||
| − | [[File: | + | [[File:RocketBar5-en.png|550px]] |
In order to remove application icon from RocketBar, select the "Remove Icon plasmoid" point in its context menu. | In order to remove application icon from RocketBar, select the "Remove Icon plasmoid" point in its context menu. | ||
| − | [[File: | + | [[File:RocketBar6-en.png]] |
[[Category:HowTo]] | [[Category:HowTo]] | ||
[[ru:Что_такое_RocketBar]] | [[ru:Что_такое_RocketBar]] | ||
Latest revision as of 22:43, 2 June 2012
RocketBar description
RocketBar provides users with a quick and convenient way to launch applications and switch between them. Thanks to KDE technologies, RocketBar is compatible with any plasmoid that can be added to the standard KDE bar.
RocketBar consists of on three zones:
1) The left one contains icon of the ROSA brand-name SimpleWelcome application and quick-launch icons for frequently used applications. By default icons for the following programs are included:
- Dolphin file manager;
- Firefox Web browser;
- Kopete instant messenger;
- Mozilla Thunderbird mail client;
- Clementine media player;
- Desktop Configuration tool.
2) The central zone displays active applications; note that the application icon appears in the central part only if there is no appropriate icon in the left zone.
3) The right zone contains additional plasmoids. By default this area contains:
- Stack Folder pointing to the “Documents” folder from the user's home directory;
- Stack Folder pointing to the “Downloads” folder from the user's home directory;
- System tray – a plasmoid that displays system notifications;
- Clock;
- Trash.
Adding RocketBar to desktop
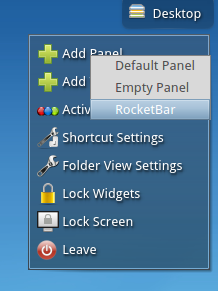
In order to add RocketBar to desktop, one should click on Plasma-Desktop icon which is located at the upper-right part of your desktop and select "RocketBar" in the "Add Panel" menu.
When added to desktop, RocketBar automatically locates itself at the bottom of the window and adjusts its height according to the screen resolution.
RocketBar configuration
RocketBar is configured in the same way as the standard KDE panel. By clicking on "Х" icon, you can access configuration panel consisting of the following sections:
- Screen edge – configure RocketBar location;
- Height/Width – set RocketBar height (or width if it is vertically arranged);
- Add plasmoids – opens a window where you can add new plasmoids;
- Add separators – create a new unused area on the RocketBar;
- Additional – opens a window with additional RocketBar settings.
More plasmoids can be added by dragging them from the "Add plasmoids" window of the configuration panel.
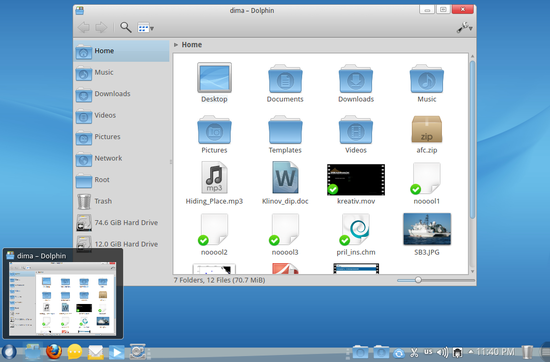
In order to add quick-launch icons to the left zone of the RocketBar, one should just drag necessary icon from SimpleWelcome. A newly added application will not be displayed at the central zone of the RocketBar; active instance of that application can be accessed by clicking the quick-launch icon again. If you drag mouse over an icon of some application, you will see a thumbnail of a running instance of that application, if any.
In order to remove application icon from RocketBar, select the "Remove Icon plasmoid" point in its context menu.


